Building OpenCV on Windows 11

For this walk-though, OpenCV 4.11 is built from source on a clean Windows 11 VM with CUDA enabled. NVIDIA codec support and cuDNN is also provided. A minimal amount of tools is installed on the VM. CMake is used for an out of source build for this example.
Prerequisites
PowerShell 7.5.4
PowerShell 5 is stale old crap and Windows CMD a brain dead shell. So:
winget install --id Microsoft.PowerShell --source winget
This gets a PowerShell 7.5 or later installed and you'll run the build from this.
Chocolatey
Install chocolatey in an Administrative PowerShell 7 window:
Set-ExecutionPolicy AllSigned

Set-ExecutionPolicy Bypass -Scope Process -Force; [System.Net.ServicePointManager]::SecurityProtocol = [System.Net.ServicePointManager]::SecurityProtocol -bor 3072; iex ((New-Object System.Net.WebClient).DownloadString('https://community.chocolatey.org/install.ps1'))
An alternet method is:
winget install --id chocolatey.chocolatey --source winget
Visual Studio 2022 Build Tools
You can download this from the Microsoft, if you have difficulty finding a download link, the following using chocolatey should work.
choco install visualstudio2022buildtools
You should now have a Developer PowerShell for VS 2022 prompt available in the Windows Terminal app. Adjust if necessary to use PowerShell 7.
Git
Poshgit is for PowerShell interoperability using git from a PowerShell shell. Otherwise use the Git Bash that comes with Git for Windows.
DO NOT USE WINDOWS CMD WITH GIT.
choco install git poshgit
FOR THE NVIDIA DOWNLOADS BELOW THE LATEST DOWNLOAD IS THE FIRST LINK. FOR THIS BUILD USE THE ARCHIVE LINKS TO GET PRIOR RELEASED VERSIONS
NVIDIA CUDA Toolkit
NVIDIA Computing Toolkit 12.6 was downloaded using the Archive link.
CUDA Toolkit - Free Tools and Training | NVIDIA Developer
CUDA Toolkit Archive | NVIDIA Developer
NVIDIA cuDNN
NVIDIA cuDNN v9.17 was downloaded using the Archive Link.
CUDA Deep Neural Network (cuDNN) | NVIDIA Developer
cuDNN Archive | NVIDIA Developer
NVIDIA Codecs
NVIDIA Codec SDK 12.2.71 was downloaded using the Archive link.
Video Codec SDK - Get Started | NVIDIA Developer
Video Codec SDK Archive | NVIDIA Developer
NASM
This is an open source assembler NASM - The Netwide Assembler.
choco install nasm
Tesseract
Tesseract is an OCR library. Using a Developer PowerShell for VS 2022 promp do the following:
cd %USERPROFILE%\build
mkdir tesseract
cd tesseract
vcpkg new --application
vcpkg add port tesseract
vcpkg install
This will download and build tesseract and its dependencies in this folder. Use this pattern for building C/C++ dependencies.
CMake
CMake comes with Visual Studio 2022 Build Tools, as does Ninja make. For this walkthough cmake-gui is used for configuration and generating the make.
Download the latest CMake from Download CMake selecting the Windows x64 ZIP. Extract the zip.
Extract the zip to a convenient location, for me it was
C:\tools\cmake-4.2.1-windows-x86_64
Next create a little helper script like C:\tools\cmake-bld.ps1 containing the following:
$env:Path += ";C:\tools\cmake-4.2.1-windows-x86_64\bin"
When you run your build you'll want cmake-gui in your path. When you build using the Windows Terminal app using Developer PowerShell for VS 2022 you will then source the cmake-bld.ps1 script you created to get your new CMake in %PATH% in your interactive shell.
The following command sources your script.
. C:\tools\cmake-bld.ps1
NOTE: source C:\tools\cmake-bld.ps1 does not work like in zsh or bash, you can only use '.'.
OpenCV and Other Source
Create a build directory in a convenient place like %USERPROFILE%\build and from there (for version 4.11) use specific shallow clones to save you from larger and longer downloads.
git clone --branch "4.11.0" --depth 1 https://github.com/opencv/opencv.git
git clone --branch "4.11.0" --depth 1  https://github.com/opencv/opencv_contrib.git
git clone --branch "4.11.0" --depth 1  https://github.com/opencv/opencv_extra.git
Build Configuration
Study the paths here, these will need to match for your build setup.
Typically walkthroughs for building OpenCV on Windows will instruct the user to copy headers, libs, and other binaries out of the cuDNN and NVIDIA Codec locations into corresponding locations within the NVIDIA CUDA Toolkit install. This is messy. Setting variables such as CUDNN_INCLUDE_DIR, CUDNN_LIBRARY, CUDA_nvcuvid_INCLUDE_DIR, CUDA_nvcuvid_LIBRARY, CUDA_nvencodeapi_LIBRARY relieves most of the pain. However, you must copy the codec headers out of the C:\tools\Video_Codec_SDK_12.2.72\Interface directory into the C:\Program Files\NVIDIA GPU Computing Toolkit\CUDA\v12.6\include directory in order for OpenCV to support NVIDIA codecs. This is more of a default with the OpenCV build scripts and the NVIDIA Codec distribution than anything else.
With later versions of OpenCV, cuDNN, and the NVIDIA Codec SDK this may change.
Before running the build, copy your customized CMakePresets.json file to the root of the OpenCV directory.
CMakePresets.json
  {
  "version": 10,
  "cmakeMinimumRequired": {
    "major": 4,
    "minor": 2,
    "patch": 0
  },
  "configurePresets": [
    {
      "name": "default",
      "displayName": "Default Config",
      "description": "Minimal configuration for OpenCV/CUDA",
      "generator": "Ninja",
      "binaryDir": "C:/Users/vagrant/build/opencv-bin-4.11",
      "cacheVariables": {
        "BUILD_EXAMPLES": "ON",
        "OpenCV_DIR": "C:/Users/vagrant/build/opencv",
        "CMAKE_INSTALL_PREFIX": "C:/Users/vagrant/build/opencv-install",
        "WITH_CUDA": "ON",
        "CUDNN_INCLUDE_DIR": "C:/Program Files/NVIDIA/CUDNN/v9.17/include/12.9",
        "CUDNN_LIBRARY": "C:/Program Files/NVIDIA/CUDNN/v9.17/lib/12.9/x64/cudnn.lib",
        "WITH_NVCUVID": "ON",
        "WITH_NVCUVENC": "ON",
        "CUDA_nvcuvid_INCLUDE_DIR": "C:/tools/Video_Codec_SDK_12.2.72/Interface",
        "CUDA_nvcuvid_LIBRARY": "C:/tools/Video_Codec_SDK_12.2.72/Lib/x64/nvcuvid.lib",
        "CUDA_nvidia_encode_INCLUDE_DIR": "C:/tools/Video_Codec_SDK_12.2.72/Interface",
        "CUDA_nvidia-encode_LIBRARY": "C:/tools/Video_Codec_SDK_12.2.72/Lib/x64/nvencodeapi.lib",
        "CUDA_nvencodeapi_LIBRARY": "C:/tools/Video_Codec_SDK_12.2.72/Lib/x64/nvencodeapi.lib",
        "OPENCV_EXTRA_MODULES_PATH": "C:/Users/vagrant/build/opencv_contrib/modules",
        "OPENCV_TEST_DATA_PATH": "C:/Users/vagrant/build/opencv_extra/testdata",
        "CMAKE_ASM_NASM_COMPILER": "C:/Program Files/NASM/nasm.EXE",
        "Tesseract_DIR": "C:/Users/vagrant/build/tesseract/vcpkg_installed/x64-windows",
        "Leptonica_DIR": "C:/Users/vagrant/build/tesseract/vcpkg_installed/vcpkg/pkgs/leptonica_x64-windows"
      }
    }
  ]
}
Running The Build
From a Developer PowerShell for VS 2022 prompt run the following:
. "C:\tools\cmake-bld.ps1"
cmake-gui  --preset defaut -S "C:/Users/green/build/opencv" -B "C:/Users/green/build/opencv-bin-4.11"
While seemingly redundant, the source and build output directores are in the cmake-gui command line and also in the CMakePresets.json file.
 |
|---|
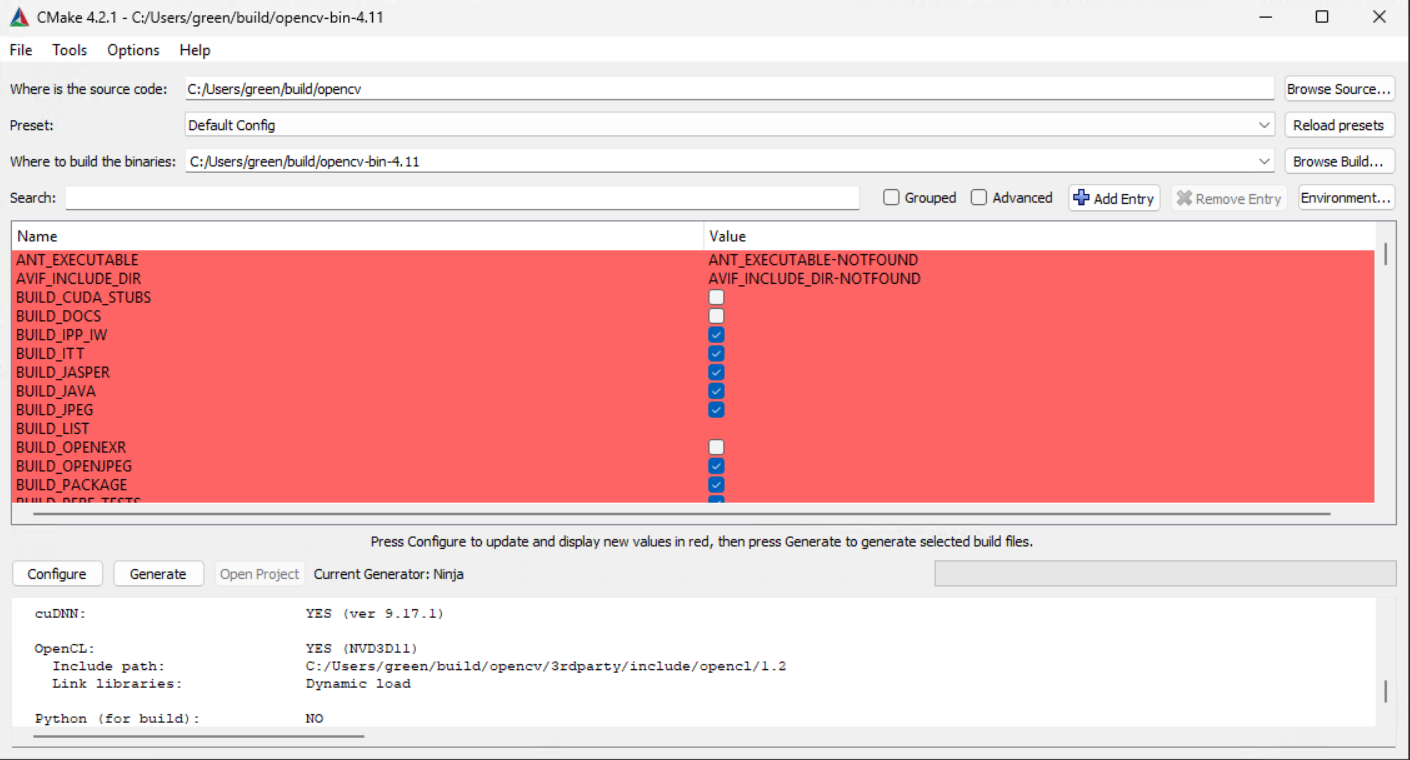
| Figure 1 |
Figure 1 shows the cmake-gui ui after running the Configure step. Examine warnings and make sure no errors occurred. Make sure that before running this step the Default Config or whatever you used for the displayName of your CMakePresets.json configuration is selected. Also, be sure to select Ninja as the generator. Ninja runs a lot faster than a Visual Studio generated build. In my opinion, Ninja is also a lot more stable.
Click Generate to generate the makefiles. Make sure no errors are in the output. Also look for warnings about items such as codec header files not being found.
From within the Developer PowerShell prompt navigate to the directory to run the build:
cd C:\Users\vagrant\build\opencv-bin-4.11
ninja
``

This will start the build, which will take a while.

==MAKE SURE YOU KEEP YOUR MACHINE FROM GOING TO SLEEP DURING THE BUILD!==

When the build is complete and hopefully a success, run

```powershell
ninja install
to install the built binaries to what CMAKE_INSTALL_PREFIX was set to.